The tent came in tonight, all except the poles, which UPS says will arrive soon. The frame looks good – reasonably strong – but the fabric looks very lightwight. McLendons has big white plastic tarps that look heavier. I may need to put one over the tent to make it hold up that long. Maybe it will add some insulation value also. One nice thing is that there are no cross-beams between the uprights so headroom will be better than I thought. We’ve had record cold and snow so I haven’t been able to do any work on the platform, even though I stayed home yesterday because the streets were too dangerous drive on. They say it will be warmer and dry this weekend so I hope to get the deck completed and the tent erected.
November 30, 2006
November 26, 2006
Boat Shed
I started the boat shed yesterday. It’d going to be 16′ x 26′. The tent is 13′ x 26′ (actually 4 x 8 meters), so I need to decide what to do with the extra width. In the right-hand photo below, each opening is 4′ x 8′, and each one will have 3 cross-beams to support the decking. I’m using 3/4″ OSB for the decking because it’s 1/2 the price of plywood. I hope it’s strong enough.


Those are double swinging doors on the fence that I added last year. The opening width is 11′, so there should be plenty of room to drag the boat out on completion.
Right now the deck is only approximately level. After I finish framing it in (but before decking) I’ll shim it to be level throughout using my new laser lavel. I’ll put some more cinder blocks under the places that will bear the most weight.
The boat will be built right on the centerline of the shed, using the plywood seam as a straight edge. I think I’ll screw the stations directly to the deck, without a strongback. The deck will be the strongback. We’ll see…
The tent should get here this week. I’m anxious to see how it looks. I hope it’s solid enough to hold up through two winters.
Update Dec 3
FInished the framing and leveled the whole thing with the laser level at dusk last night. I couldn’t see the laser line in the bright daylight. The tent poles were delayed because of the snow so I hope to get them tomorrow. I’m afraid to fasten down the decking before the tent arrives because I don’t want the OSB to get wet. I’ve got a dozen cinderblocks under the frame to support it.

November 20, 2006
Costs
$285 Godzilla plans (Devlin – 10/06)
$55 Book, video & Catalog -(Devlin – 10/06)
$35 24″x36″ Xerox copies of plans (Kinkos – 10/06)
$100 Misc tools – Laser level, 30’tape, short level (Home Depot 11/06)
$280 Wedding Canopy 🙂 – BestChoice 13’x26′ shop tent, $160 tent, $120 shipping (Ebay/PayPal – 11/19/06)
$142 Lumber for deck to put the tent on (Home Depot – 11/24/06)
$65 50′ 10 guage extension cord and triple tap – main power from house to shed (Home Depot – 11/24/06)
$85 More lumber for deck and sawhorses (Home Depot – 11/24/06)
($1000 spent so far, and not one thing will end up in the boat!)
$143 More deck lumber, screws, support blocks, 1/2 the plywood decking (Home Depot – 11/25/06)
$13 Surform for engine modelling (McLendons – 11/25/06)
$100 Radial Arm Saw (used – from CraigsList -12/2/06)
$120 Plywood for deck and 2 shop lights (Home Depot – 12/2/06)
$110 More wood for the shop, and some of the strongback (Home Depot – 12/19/06)
$2700 Hull and bulkhead plywood (Edensaw 12/21/06)
November 19, 2006
Interesting Hardware
Superus Drop-Away Seating System ($680!)


http://www.marlinespike.com/fender.html 4″x20″ $120/pair

Do-it-yourself: http://www.floatingbear.ca/RopeFender.HTM
The new model MK-4 features include, fold up arm rests, flip up front bolster for easy standing and more available room between your steering wheel and the seat, a FULL reclining seat back for complete comfort as well as fully adjustable or removable headrest. This seat is equipped with our Track – lock slide swivel assembly which will fit over any existing pedestal you have on your boat no reinstallation needed. Available colors include, white, off white, black, blue, turquoise, camel, yellow and red marine vinyl.Dimensions: seat width 18 in., back height 30 in. and overall depth 25 in. with adjustable headrest.
Model MK-4 INTRODUCTORY PRICING $1,595.00


DELUXE ALUMINUM CHAIR STAND has sturdy 1″ anodized aluminum tubing utilizing four-prong spider swivel which rotates on precision aluminum 2-7/8″ diameter tube. Swivel has locking device. Legs supplied with poly tips. Ideal for use for all types of pilot, helmsman seats and fishing chairs. Leg spread 21″ square. 30″ height.

November 12, 2006
Godzilla Model
Home with a bad cold for the last few days, so I built a scale model of the Godzilla. It’s 1 inch: 1 foot, which is the same as the drawings. So I just laid the birch model plywood (1/16 bottom, 1/32 sides) under the drawings and pricked holes using a steel awl. Then connected the dots and cut out the parts. I used scissors for the thin stuff and an exacto knofe for the thicker parts. Blue tape for the stitching and thick instant glue to hold it together.
It’s not a great model, but it’s square and to scale so I can use it to mock up the interior. The cardboard is the first mockup of the inside to help understand how the parts fit together. The little guy is 6′ 1″ tall.

Bow. There will be a seat/chain locker just forward of the guy.
Note the sideways bed with the raised footwell. The hole aft will be the outboard motor well. I haven’t designed the well yet.
Shoebox construction! The pilothouse will have a sliding door on both sides.
View from the stern
Turn-over (3 images). The pins are in the balance points – the boat is relatively stable in both positions:


Need to drop the boat down after flipping…
November 11, 2006
Bamboo Sole?
I was looking for teak prices on the Crosscut Hardwood site and noticed that they sell bamboo plywood for flooring. A quick Google search for ‘bamboo flooring boat cabin sole’ returned some interesting hits:
Marquis Yachts 55: “The bamboo sole becomes a design centerpiece for this highly trafficked area. Bamboo is an exotic hardwood with a textured look, and it’s very resistant to wear.”
Alden Yachts Brenton Reef 40:”[T]he cabin sole is pale yellowish white bamboo with teak edging. (No, I’d never heard of bamboo used this way, either, but it works very well: hard as maple and very moisture-resistant.)”
Rybovitch Express 42: “The Hawaiian koa joinery and bamboo sole aboard Buffett’s Margaritavich are unique.”
The light color, hardness, and varied texture of bamboo sounds like it might work well as a sole. I know it’s used in kitchens a lot. I’m concerned about the laminating glue and possible slipperiness when it’s wet.
It looks like vertical grain would be best:
A natural bamboo stock is hollow and the walls of the plant are fairly thin. Strips of bamboo are therefore laminated together to make our 5/8” flooring. The terms “horizontal” and “vertical” refer to the manner in which bamboo strips are laminated together. In the horizontal style, the strips are laid flat so the top surface shows the bamboo’s natural growth rings, or “knuckles.” In the vertical style, the strips are turned on their sides and laminated together in long, slender rows creating a different appearance. BuildDirect.com


Small Tug picture Page
I found a bunch of photos of small tugs online so I made a page to show them all. I want to have a place to work out the detailing and the layout of the boat. After looking at the pictures for a couple of hours I’ve realized that people really like riding in the bow of the boat if it’s protected and comfortable.
A couple of my favorites:


November 3, 2006
Twin Keels
I plan on adding twin keels to the boat instead of the deep single keel shown in the plans. The keel as designed accomplished two things – it contained the propeller shaft, and protected the prop from obstructions in the water. Using an outboard removes both of those considerations. Here are the advantages of twin keels for this boat as I see them:
- Less draft – probably 6-10 inches less than the original. I love going in places most boats don’t dare to.
- Smooth water flow to the prop.
- It can dry out at low tide. Puget Sound has large tides – 12 to 16 feet being pretty common. I want to sit on the mudflats in Padilla Bay and watch birds while the tide is out.
- Ability to sit flat on shore or haul on a flatbed truck.
- Roll attenuation? Faster hull speed? Smaller wake? All suggested by the following articles.
My main concerns about this configuration are added drag (not too concerned), and interference with steering – it may not turn quickly. Both of these can probably be alleviated by good design.
Boojum’s Twin Keels – article about the advantages of twin keels on a small heavy displacemnt tug cruiser.
Roll attenuation strategies – for motor yachts and motor sailers
Some degree of roll attenuation is contributed by the single chine hull form itself. A single chine vessel appears to have roughly twice the roll damping ability of a rounded hull form (per published model tests in Marine Technology, performed on vessels having similar hull forms). Roll amplitude will be less; roll acceleration may be greater, rolling will decay more quickly.
But I think my main reason for thinking of twin keels may have been a desire for freer contact with the shore. A fin-keel boat is bound to deep water. Any contact with the bottom is so likely to result in a predicament, with the boat lying on her side for half a tide, that she must sail with a large margin of safety most of the time, keeping far from shore, or right in the middle of the channel. In essence, she must keep clear of all kinds of tempting places where the bottom just might be too close to the top.
With twin keels we go right on up through the fleet and usually find, between the first row of moorings and the shore, enough water for us to swing comfort ably. And if the tide should go out and leave us aground in the middle of the night, who cares? It will be back in the morning. Thus, almost everywhere we go, we get the best berth in the harbor closest to the landing, close enough to see what’s going on onshore, surrounded, by the local fleet instead of outcast on the fringes.
BoatDesign Blog – thread on twin keels
It would appear as though the fore-to-aft placement of twin keels would definitely favor the more aft placement.
Image: http://www.rm-yacht.com/phototheque/phototheque.cfm#
This is a nice boat, by the way. Simple, clean lines inside, plywood construction.

Timeline – Initial Guess
- Buy and install tent (1 week, Dec) – $300
- Add power, workbench, sawhorses and lights (2 weeks, Dec) – $200
- Install base for bulkhead (2 weeks, Jan) – $400
- Scarf plywood for hull (2 weeks, Jan)- $2000
- Build bulkhead/forms (3 weeks, Feb) – $1000
- Stitch hull and tab together (3 weeks, March) – $300
- Add keels ( 2 weeks, April) – $300
- Glass hull, fair and sand, then paint (4 weeks, May) – $500
- Turn over ( 1 week, early June)
- Start interior (gives 1 year to launch date)
November 1, 2006
Deck and Cabin Layouts
I’ve been playing with the deck and cabin layouts, trying to make the boat accomplish what I want it to do. As with every boat, there are many opposing factors – comfort, safety, number of people it can carry, and dozens more. I’ve already made a couple of decisions that would probably give the designer hives – changing the inboard to an outboard in a well, and adding double keels so it sits flat on the ground, and to smooth the water flow to the outboard. Here are some of my ideas for the interior:
This is my most recent attempt. Dock to starboard against tall docks so you can step off the extended cabin top to the dock. Lots of storage space in the bow for fenders and lines, as well as ground tackle. Good headroom over the main part of the bed. 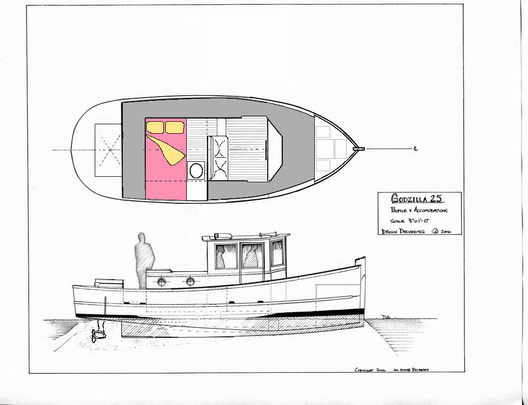
With a drain in the stern the dinghy can be stored upright, with rainwater draining out. This needs some sort of davit system to launch the dinghy, but it’s probably the best way to carry a large boat like this. I’m concerned about top-heaviness, so the dinghy should be lightweight. The gear (oars and pfd’s) can store right inside, so you can launch and go.

This is the original design. I’m going to look into dropping to foredeck down a little and making it flatter so it’s easier and safer to walk on. With the engine moved to the stern, the little aft cabin might be for the head and storage.
