Boatbuilding Blog

May 8, 2010

Pocket Galley

Filed under: Building - Interior — tomlarkin @ 10:54 am

The pilothouse seats in normal position:
Pilot seats in normal position

Lower the seat backs and slide the seats forward:
Pilot seats folded down

Flip them up to reveal the galley. Standing at the sink, you have almost 9 feet of headroom above:
Galley

A new whistling teapot and some old plastic camping dishes. The sink has a folding spigot and pressure water. The stove is butane for safety:
Galley with teakettle

Flip down the aft-facing cabinet door and prop it up as a dining table:
Galley all opened up

And it’s snack time (nom nom nom). Lots of storage under the sink and stove. Room for two, or a cozy three at the table, sitting on the edge of the bed:
Sitting at the table

Doors in the closed position. They need to be finished, obviously:
Cabinet doors closed

An interesting note – the hole in the center of the lower panel above is one that I drilled when making the bulkheads almost four years ago. The hole is at the intersection of centerline and designed waterline and every bulkhead had one. I lined up all the holes with a laser level to be sure the form was straight before adding the hull panels. Now I want to find someone who can carve a compass rose around it.

Here’s a picture from December 2007. I’m installing a bulkhead. The laser shone through all the holes from stern to stem, and made a tiny cross-shape on the stem piece:
2007 bulkhead with laser light

February 8, 2010

More Parts Going In

Filed under: Building - Interior — tomlarkin @ 11:56 pm

Seats, cabin heater, footrests, cabin sole, bow eye…  Next weekend I start the 12 volt wiring.

IMG_0327

September 6, 2009

Dashboard Mockup

Filed under: Building - Cabin, Building - Interior — tomlarkin @ 9:14 pm

It’s been too rainy and humid to paint so I spent yesterday working on the dashboard design. I went ahead and bought the hydraulic steering (as opposed to mechanical) so I can add an autopilot later on if I want.    It’s a really beautiful piece of engineering. The fluid pumps are built into the steering wheel post.  Fisheries has a cutaway model – the steering mechanism has a canted plate that pushes a series of small pumps as the wheel turns. The downside is that it’s three inches deeper than I had planned for. Space between the seats and the wheel is already very tight.  It’s hard to see in the picture below, but I inset the mount 2 inches into the dash to reclaim some of the space.  This is actually my third dash mockup.  It’s hard to figure out the design until I have the actual parts that will be installed. The only things I still don’t have are the motor parts – shifter/throttle, and the engine gauges.  The navigation console will mount above the dash so I don’t need it yet.

Teleflex hydraulic steering post  Dashboard

July 4, 2009

Exactly One Year Over Schedule!

Filed under: Building - Cabin, Building - Interior — tomlarkin @ 10:50 am

I promised I would have the boat in the water last 4th of July. Then I promised this 4th of July.  Oy.  Lately I’ve been hoping for early September so I could boat to the Wooden Boat Festival in Port Townsend, but it doesn’t look like that will happen. Maybe I can be a Christmas Ship instead 🙂

On the plus side, I’m pretty much done with construction except for the sliding doors. Now it’s a lot more sanding, priming and painting.

Galley is coming together:
Galley

I cut up my last sheet of 3/4 ply today – pilothouse sole, galley counter, and helm seat supports. Having full-size patterns let me lay out the pieces to minimize waste.
Cutting with patterns

June 25, 2009

Work Bench in the Boat

Filed under: Building - After Flipping, Building - Interior — tomlarkin @ 11:51 am

I added this work table last week. It’s just sitting on top of the aft cabin.It’s a good work height, and holds all the stuff I need again and again. Now I don’t have to climb out of the boat so often. I wish I’d done it a long time ago – my knees are feeling the strain of this work. I’ve been building this thing for 2 1/2 years now, almost every weekend, and a couple of nights a week.  The end is in sight though, I just got my last 2 sheets of plywood delivered today, and the interior construction is approaching completion. Now more finish work, priming and painting, electrical, and plumbing.

Work Table

Seat box – the driver and passenger seats go on top of this. The cutout on this side is for binocular storage. The larger one on the far side is to the storage under the stove and sink – for dishes and food. Fresh and grey water tanks, water pump and bilge pump below that.  Batteries and charger go below the sole at the bottom of the picture. I added 3 floors there today to support the weight of the batteries.

Seat box

April 8, 2009

Forepeak Work

Filed under: Building - Cabin, Building - Interior — tomlarkin @ 1:17 pm

I’m working on the interior, starting with the forepeak. The forepeak will have a small berth, some storage lockers, and the head. This is also where the shore power comes into the boat.  The space is pretty small because of the walk-around deck ahead of the cabin. I wish I had moved the forward bulkhead forward a few inches. In fact, the space is so small that I inset the toilet paper holder and the 110-volt shore power panel into the locker just forward of the cabin. Mounting the toilet paper holder on the surface stuck out too far. I’ll take some pictures when that is more finished.

Head mockup – there will be a single step down to the head level from the pilothouse sole.
Head in place temporarily 

Forepeak construction – since this space is so hard to get to anyway, I’m making it into a waterproof compartment with 2 inspection ports. The berth flats are glassed in solidly, adding strength along the whole bow area right at the waterline.
Support structure for watertight compartment   Forward flats

Here the forward flats have been glassed in place and the lockers are being fabricated. The round holes are for ventilation. The visible holes will have stainless vent covers to make them pretty.  Again, the supports and flats were filleted and heavily glassed, adding a lot of strength in this area.

Locker structure  Locker flats being epoxy-coated on the underside  Locker flats installed  Locker flats with cutouts replaced

New tool – I replaced my old router with this laminate trimmer. It’s so much nicer. It’s easier to work with and fits into small spaces. I haven’t pulled out the router once since I bought this.
Ridgid laminate trimmer

June 2, 2008

Gas Tank

Filed under: Building - Interior, Hardware — tomlarkin @ 7:05 am

I’ve spent the last few weeks working on the gas tank installation and building all the structure under the sole where the tank goes. Basically, I made a big tray, somewhat oversized, for the tank to sit in. (Plastic tanks swell as they fill.) I lined the tray with neoprene for padding and added some nylon webbing to hold the tank into the tray. The whole tray lays on four 1 x 2 stringers to keep the tank level. The stringers are attached to some new partial bulkheads under the sole. There are many vent holes throughout to keep gas fumes from building up. The tank and tray are easily removable to access the hull below. Another weekend of this and I should be ready to prime and paint this area and start working on the inside of the cabin.

The Rain Cat inspects the boat:
Rain Cat in the boat

The tray before the neoprene or primer. I glued the fabric in with spray adhesive:
Tray, tank, and neoprene

Below the tank. That’s the motor well in the lower left:
Tray support structure

Tray dropped in place. It will be bolted through each end. The original strap attachments were plated steel, so I discarded them and bought some nice stainless ones:
Tray dropped into place

View showing ventilation holes and Port locker lid.  The space next to the tray will hold a bilge pump and the depth sounder through-hull.  The locker with the lid will hold tools and spare parts for motor maintenance. The tray is level – the sole slants to the stern for water drainage:
Tray and vent holes

Tank strapped into tray:
Gas tank strapped in

Trying to decide if it’s a good idea to have the gas fill inside the Starboard locker:
Gas tank fill mockup

Putting the gas fill inside the locker seem(ed) like a good idea:

  • It’s lockable – 25 gallons of gas is becoming a real investment
  • The hardware is out of the weather so it should last longer
  • One fewer thing on deck to stub your toe on
  • The tray will catch any drips so you can dispose of them correctly. There’s not much change of spilling gas into the boat or the water.

I’ve asked about this on the forum. We’ll see what they say…

(Added same day…) The forum really didn’t like that idea. I’ll put the deck fill on the deck. Maybe I’ll live a little longer. Here’s one of the milder comments: “The risks associated with what you are proposing are huge…”

January 22, 2008

Seats!

Filed under: Building - Cabin, Building - Interior, Hardware — tomlarkin @ 2:01 pm

I went to a junkyard auto recycler on Aurora Avenue (Pick-a-Part) and got some nice seats out of an old Honda. Grabbed the steering wheel too so I can make make a steering-station mockup. Cost an hour of my time and $50.00. I like the idea of reclining seats in the boat. They also adjust 6 inches fore and aft. I’ll see if that’s enough.

Honda car seats

I’m having a very hard time designing the seating, steering, and instrument placement. I’m going to have to build it all full-size to see what works.

October 2, 2007

Flipped!

Filed under: Building - Before Flipping, Building - Cabin, Building - Interior — tomlarkin @ 1:37 pm

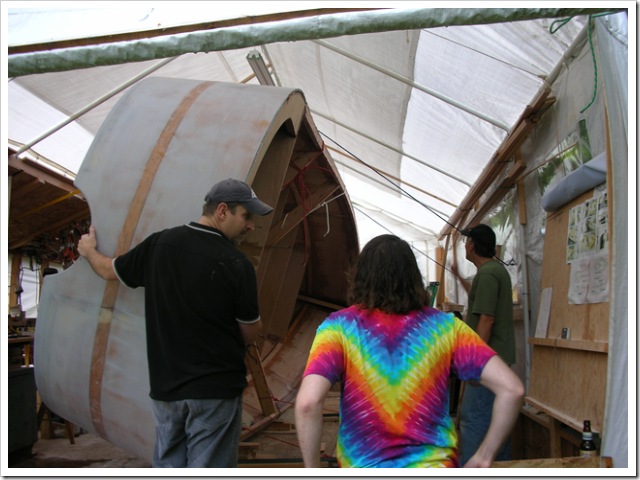
We flipped her over yesterday. With the great help of two friends – Jim and Eric, we got the task done in just a few hours. Not even any injuries!

There were some challenges – mostly that the tent it’s in is only three feet wider than the boat and only 18 inches higher than the beam of the boat. And the tent frame is too fragile to fasten anything to for lifting. So what we did was to spin it more-or-less in place, using ropes and come-alongs.


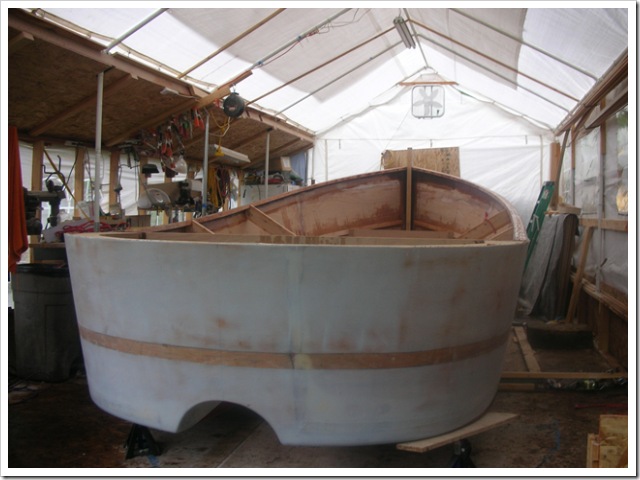
Here’s a sequence showing the whole process.

(Link to full-size images, hosted on Microsoft SkyDrive.)

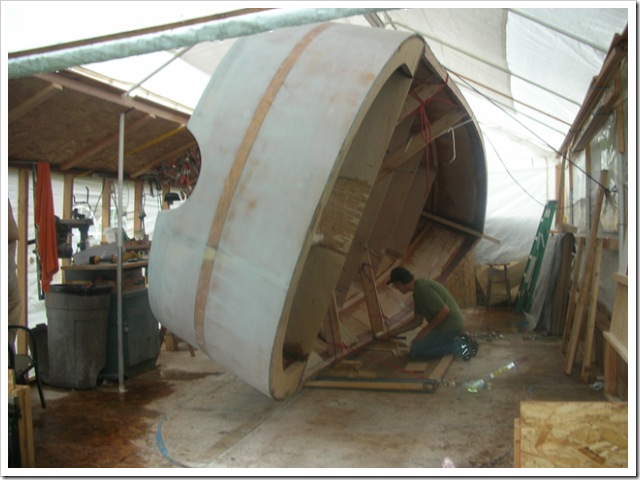
Saturday morning I raised the stern with a hydraulic jack, set it on sawhorses, and dismantled the strongback. The bow is resting on the stem piece.

DSCN1431

Then I swept and vacuumed below.  I built a sled from a sheet of plywood with steel eyes to hook 2 come-alongs to.

a

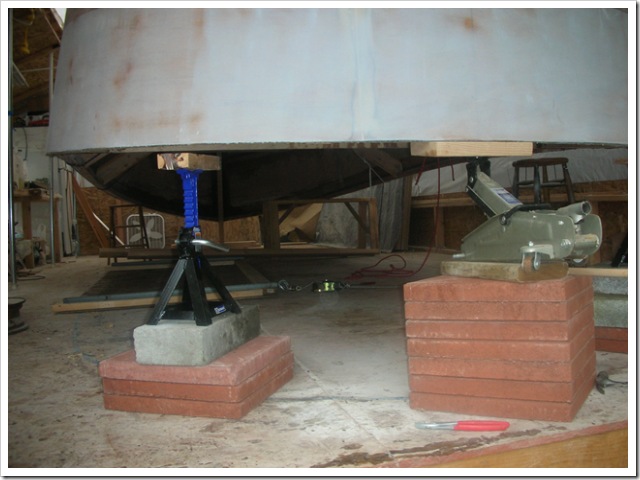
Then I slowly lowered the stern to the deck. I jacked up one side of the boat so most of the weight was on the sled.  Meanwhile, I ran four lines (2 on each side) from the internal bracing around the boat and through holes punched in the tent walls to solid points on either side. The South side mounted to the house, and the North side went to a canoe rack I’d installed a couple of years ago.  I replaced one of the South lines with a webbing-style come-along because I knew that would be the line that needed most of the lifting force. You can see the lines below.

b

Early Sunday afternoon the guys showed up and we jacked the North side up bit by bit until all the weight was on the sled. We took up the slack on the South side lines and removed the supports and the boat stayed up like we hoped it would.

c

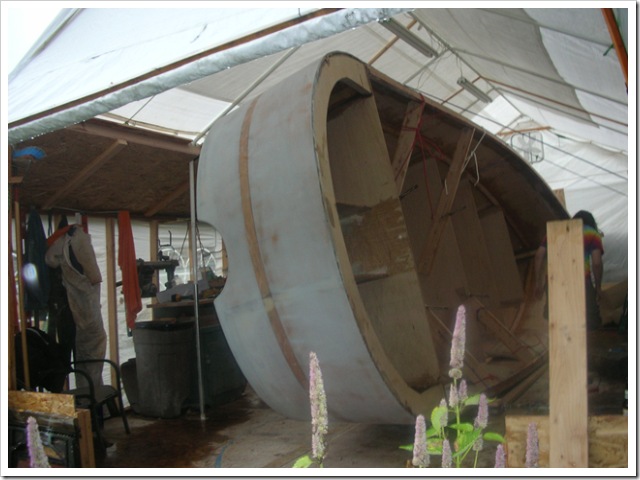
More lifting. You can see the temporary diagonal braces bolted to the bulkheads. At this point we couldn’t raise any more because the side of the boat hit the tent poles on the South side. So we slid the bottom corner of the boat North using the come-alongs hooked to the sled.

d

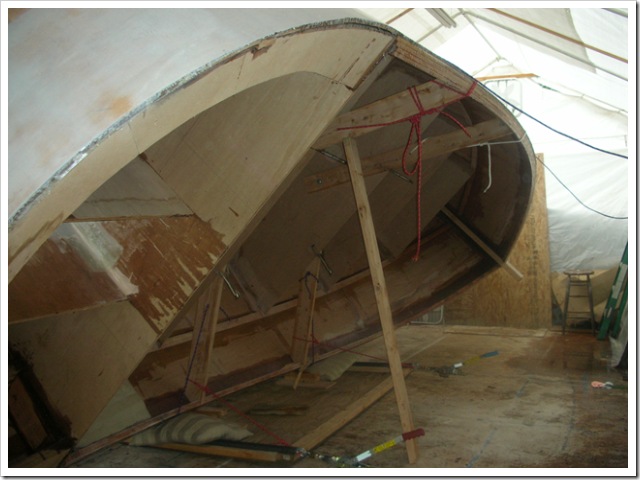
More sliding. We’re approaching the point where she will want to fall to the left instead of the right, so we tightened up the North side lines.

e

I’m testing the line as the others stand wisely out of the way in  case she slides or falls.

f

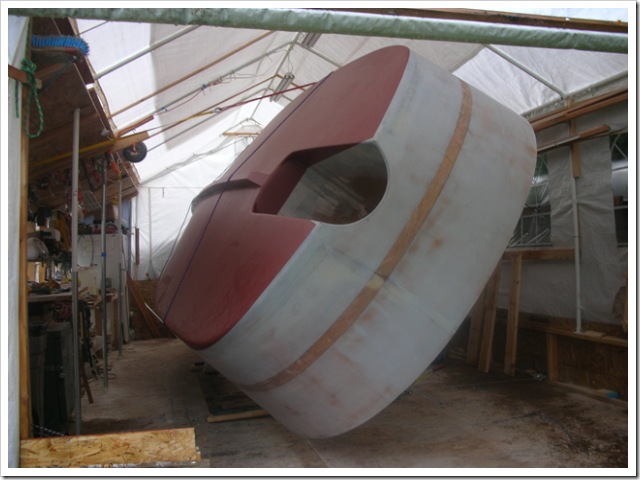
Adjusting the blocks on the sled.  She was pretty stable in this position with all four lines tight. As far as I could tell she didn’t flex at all while we did the turning.

g

A little further…

h

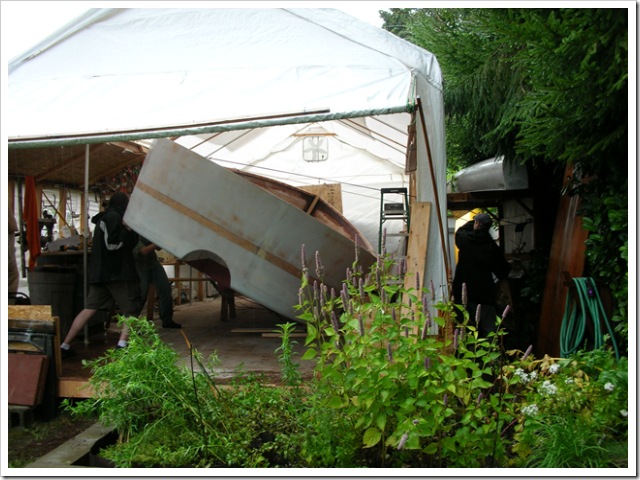
Once she was fairly stable on her side we moved her over on the sled by rocking her forward and aft until she was in the right spot.

 i

Jim and Eric lowered her down by letting out the lines a little, one at a time. Each line went through a pulley to a cleat, so they had pretty good control all the time. 

j

Moving the sled over to keep her centered in the tent.

k

Almost down! You can see Jim on the right letting the line out while Eric and I steady.

l

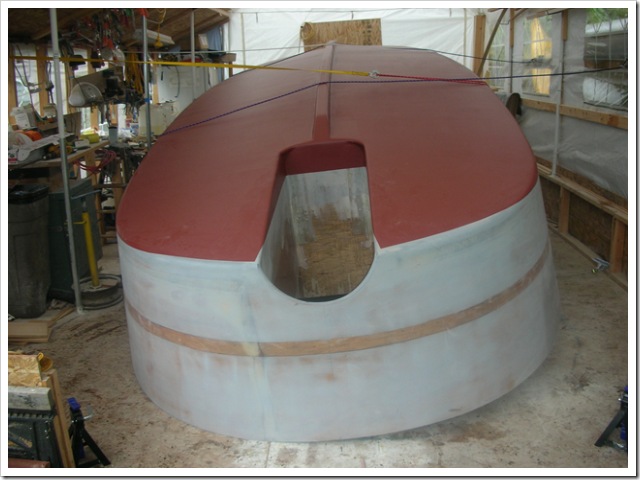
She’s upright! I’ve never had such a complicated series of tasks work so well, with few unforeseen problems. A lot of that is due to the thought and safety-consciousness of the guys helping.

m

After flipping, we had a great meal made by Meryll, drank lots of beer, and sat around for a while. Jim had to leave, so Eric and I spent a while leveling her with jack stands and various blocks.  Then we drank some more beer!